After creating your own content in the Hub or downloading content from the 6clicks Content Library, your next step may be to put the content into use at the Spoke level.
You may also want to add content to a Spoke template, so that any Spokes you create using the template will have all required content ready.
Content can include assessment templates, projects & playbooks, control sets, and authority documents.
Table of contents:
- Pushing audit & assessment templates
- Pushing project & playbook templates
- Pushing control sets
- Pushing authorities
- Activity log
Pushing audit & assessment templates
This section discusses pushing assessment templates to select Spokes. To learn how to send assessments to Spokes in bulk and include respondents, head here.
Head here to learn how to add a template from the 6clicks Content Library, if you don't have any templates yet.
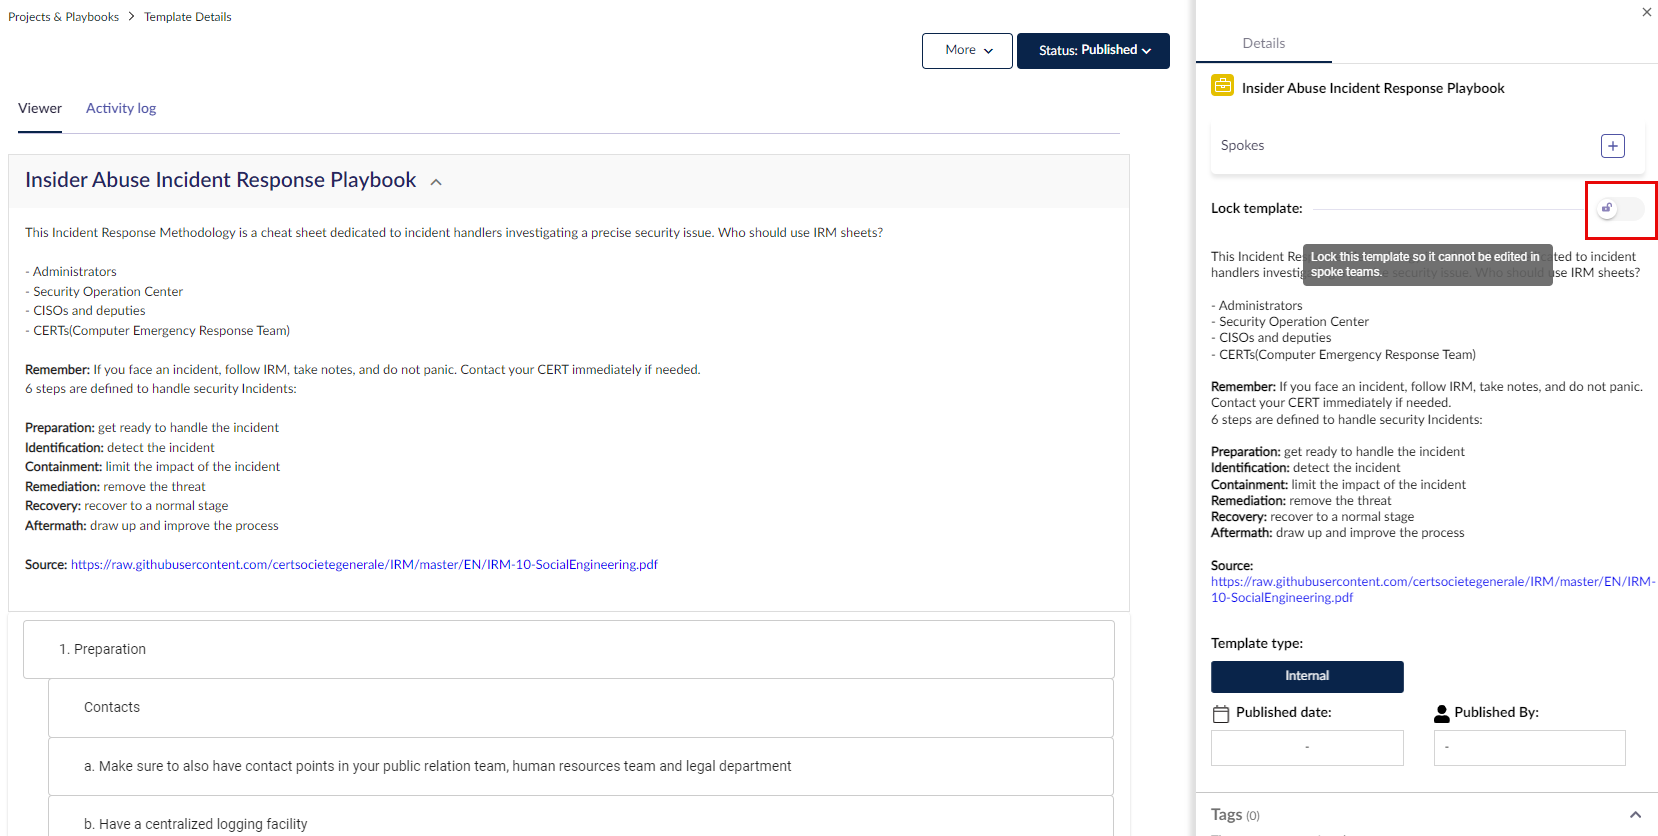
Before pushing a template, you may want to lock it so that your Spokes cannot edit it and can only use it as is.
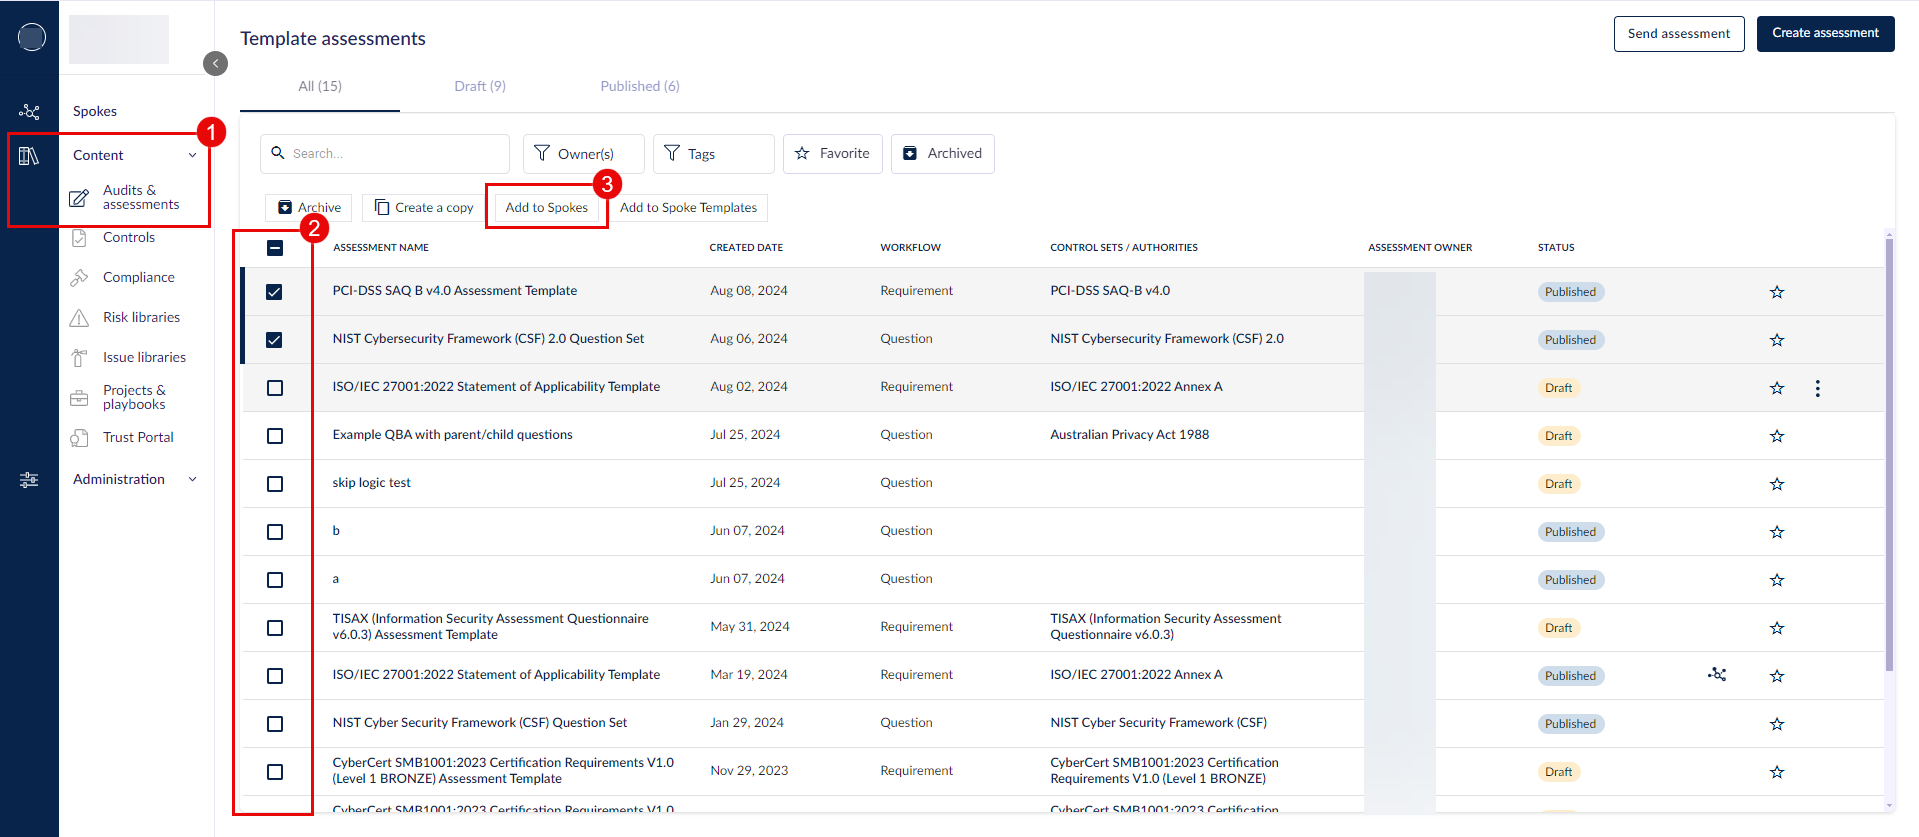
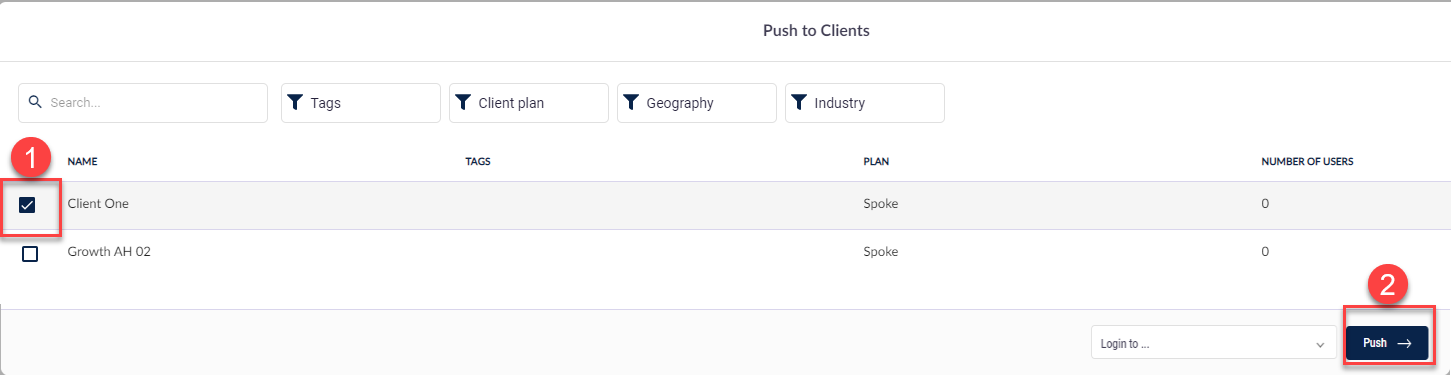
Go to Content > Audits & assessments (1) and check the templates that you need to push (2). When you are done, click Add to Spokes (3) or Add to Spoke Templates.
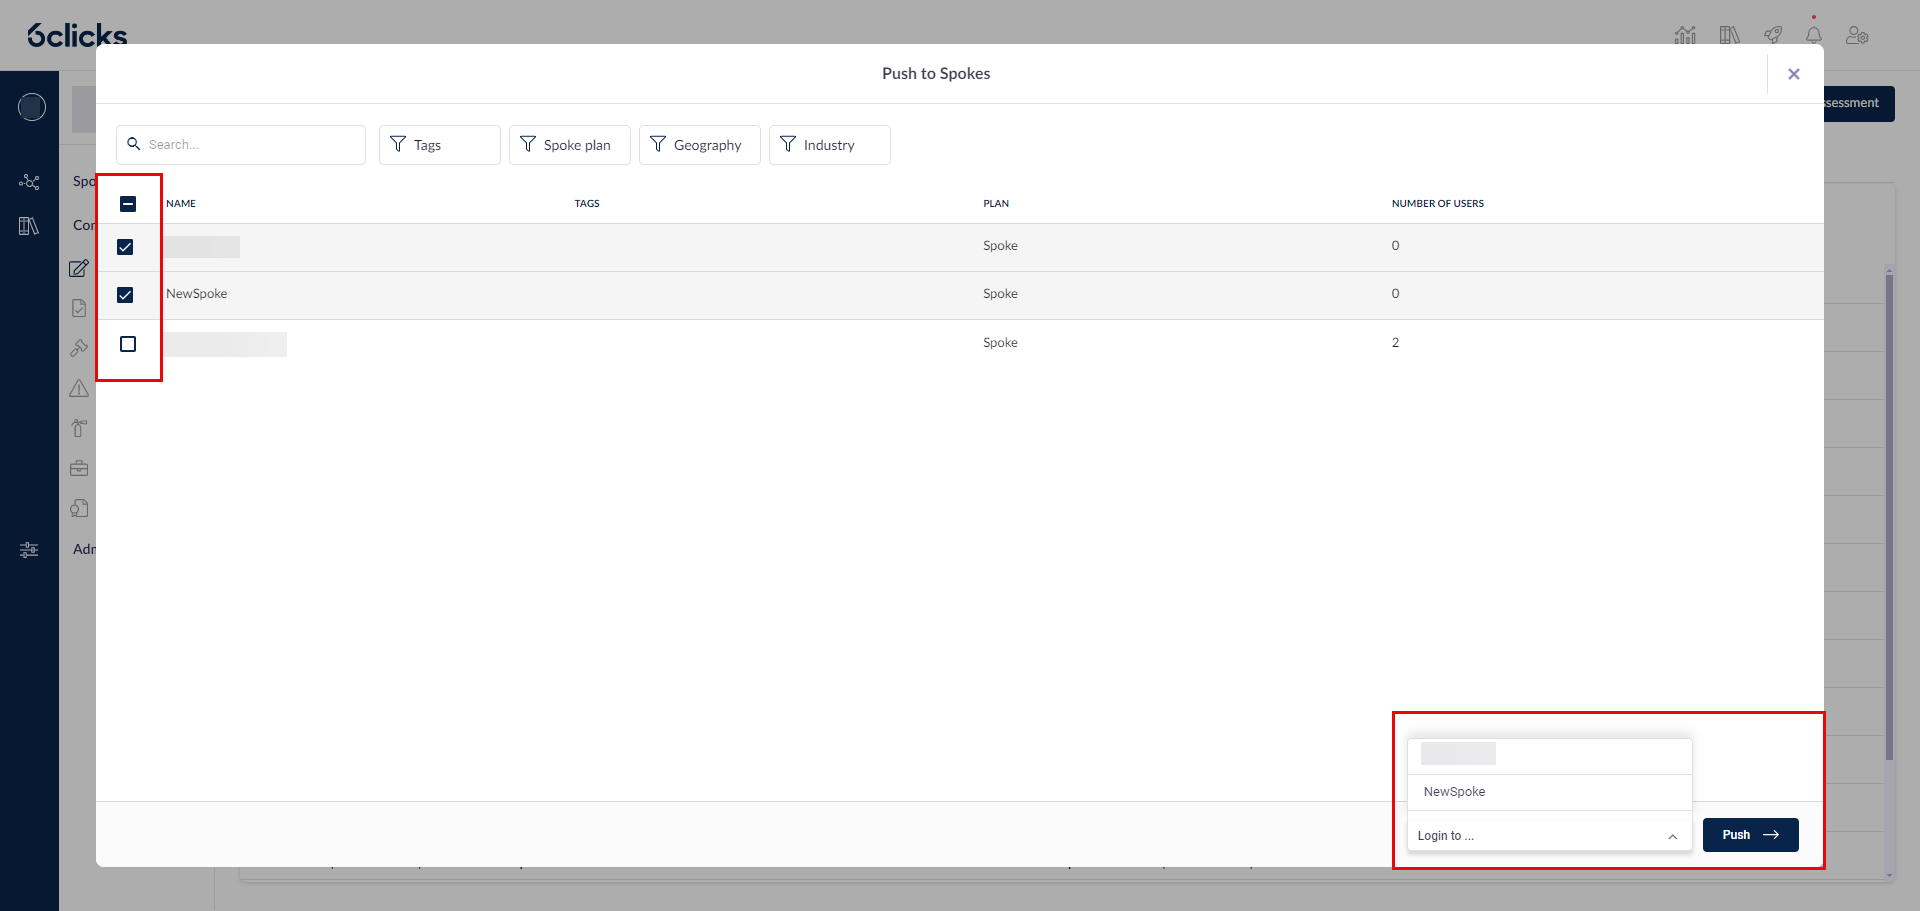
Select the Spokes that you need to push the templates to. You can choose to login to a spoke to see the template at the spoke level or leave the "Login to..." drop down empty and stay in the Hub.
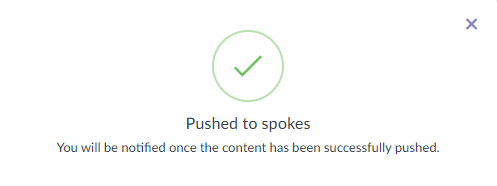
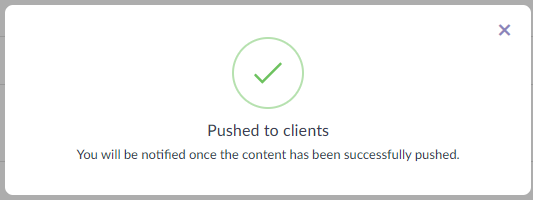
The push action will run in the background, and you will be notified when it is complete.
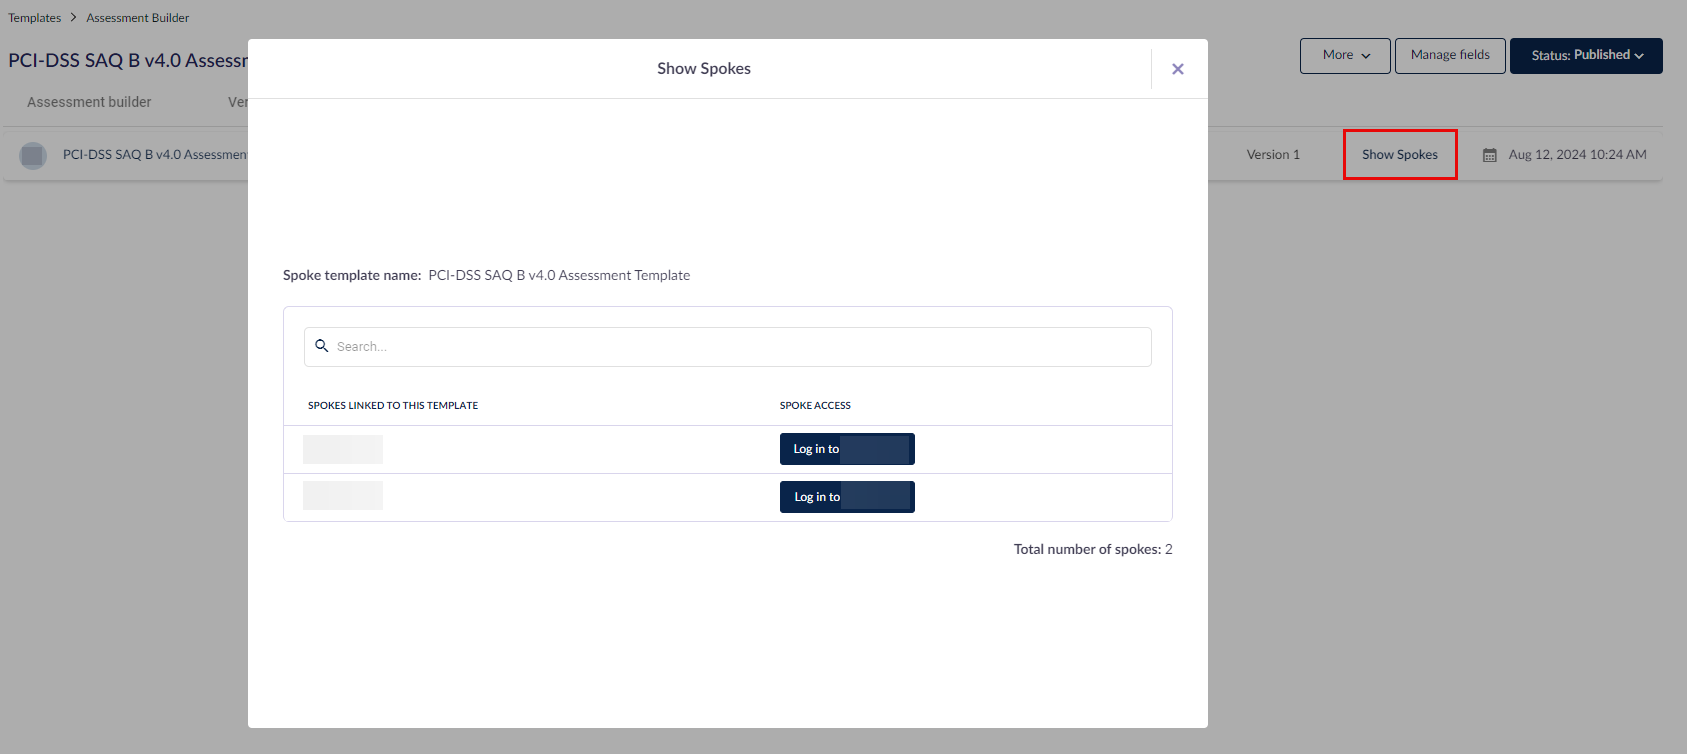
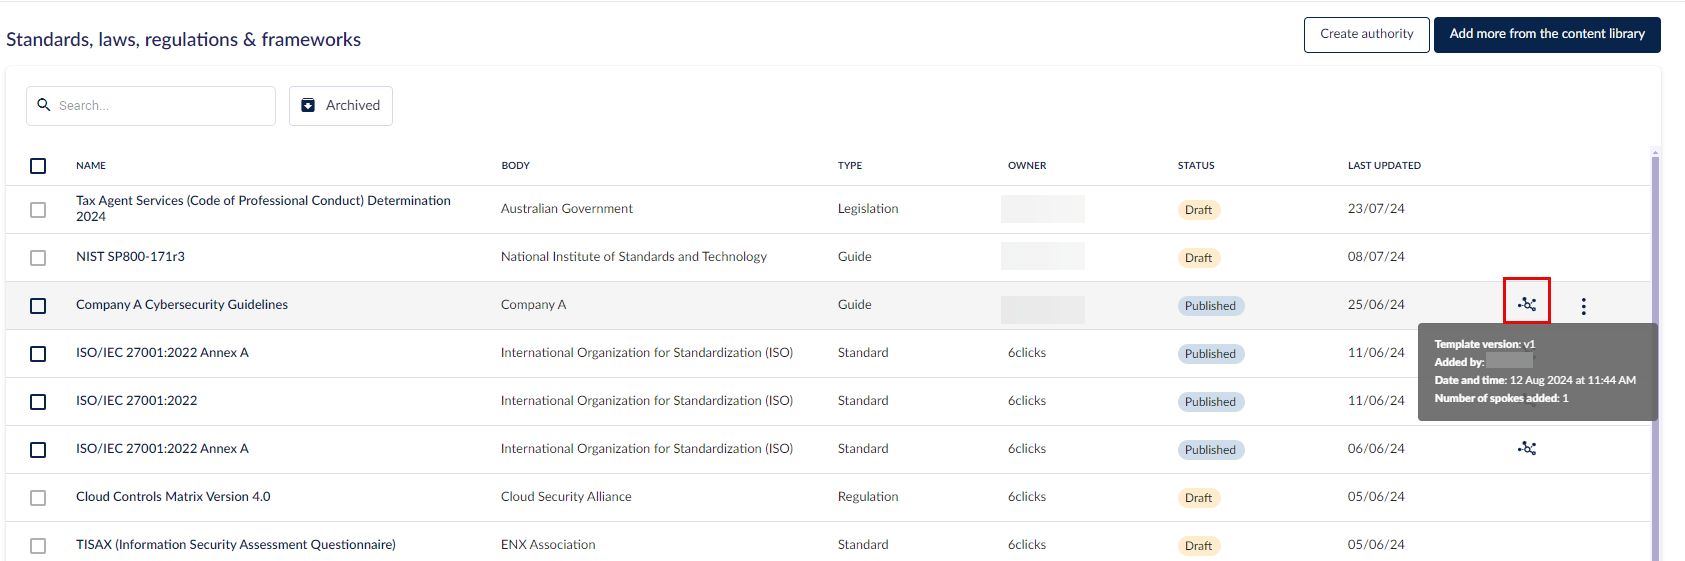
A Hub & Spoke icon will appear next to content that was pushed to Spokes. Hovering over this icon will show more details about the push.
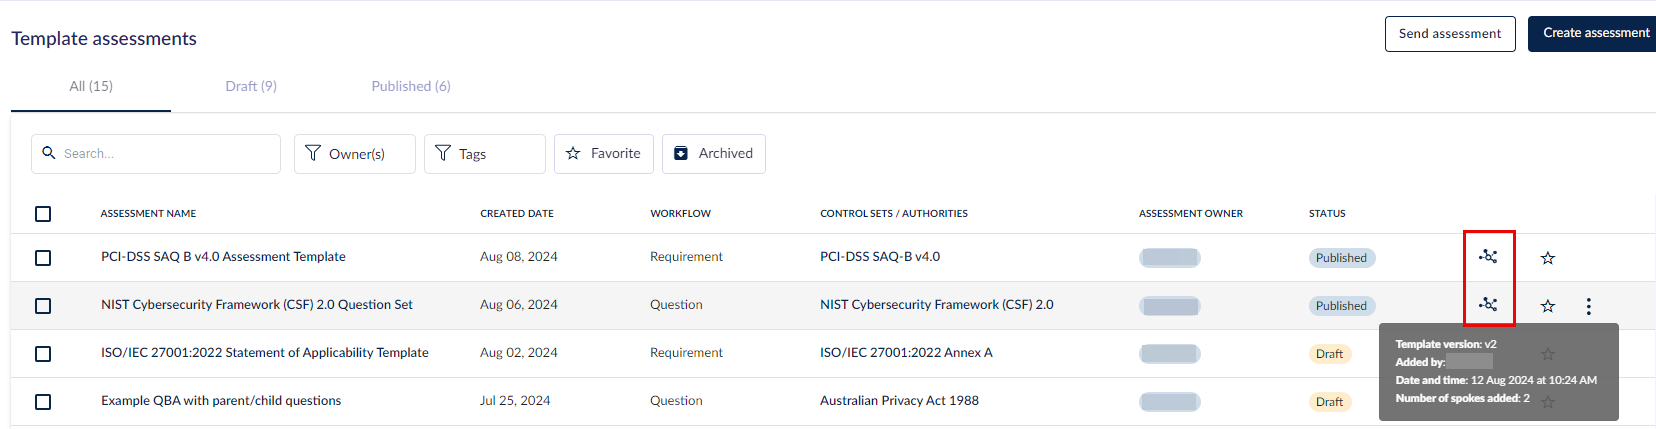
- Template version: which version of the template was pushed, according to the Versions tab in this template
- Added by: the user who performed the push, according to the Activity log tab
- Date and time: when the push occurred, according to the Activity log tab
- Number of spokes added: the number of Spokes that this template is in, according to the Activity log tab
This piece of content is available for use in the Spoke/s it was added to.
If this content was added to a Spoke template, it will be in Spokes created using the Spoke template.
Your next step may be to create an assessment based on this template. For Question-Based Assessments, head here. For Requirement-Based Assessments, head here.
Pushing project & playbook templates
Head here to learn how to add a template from the 6clicks Content Library, if you don't have any templates yet. Head here to learn more about projects & playbooks.
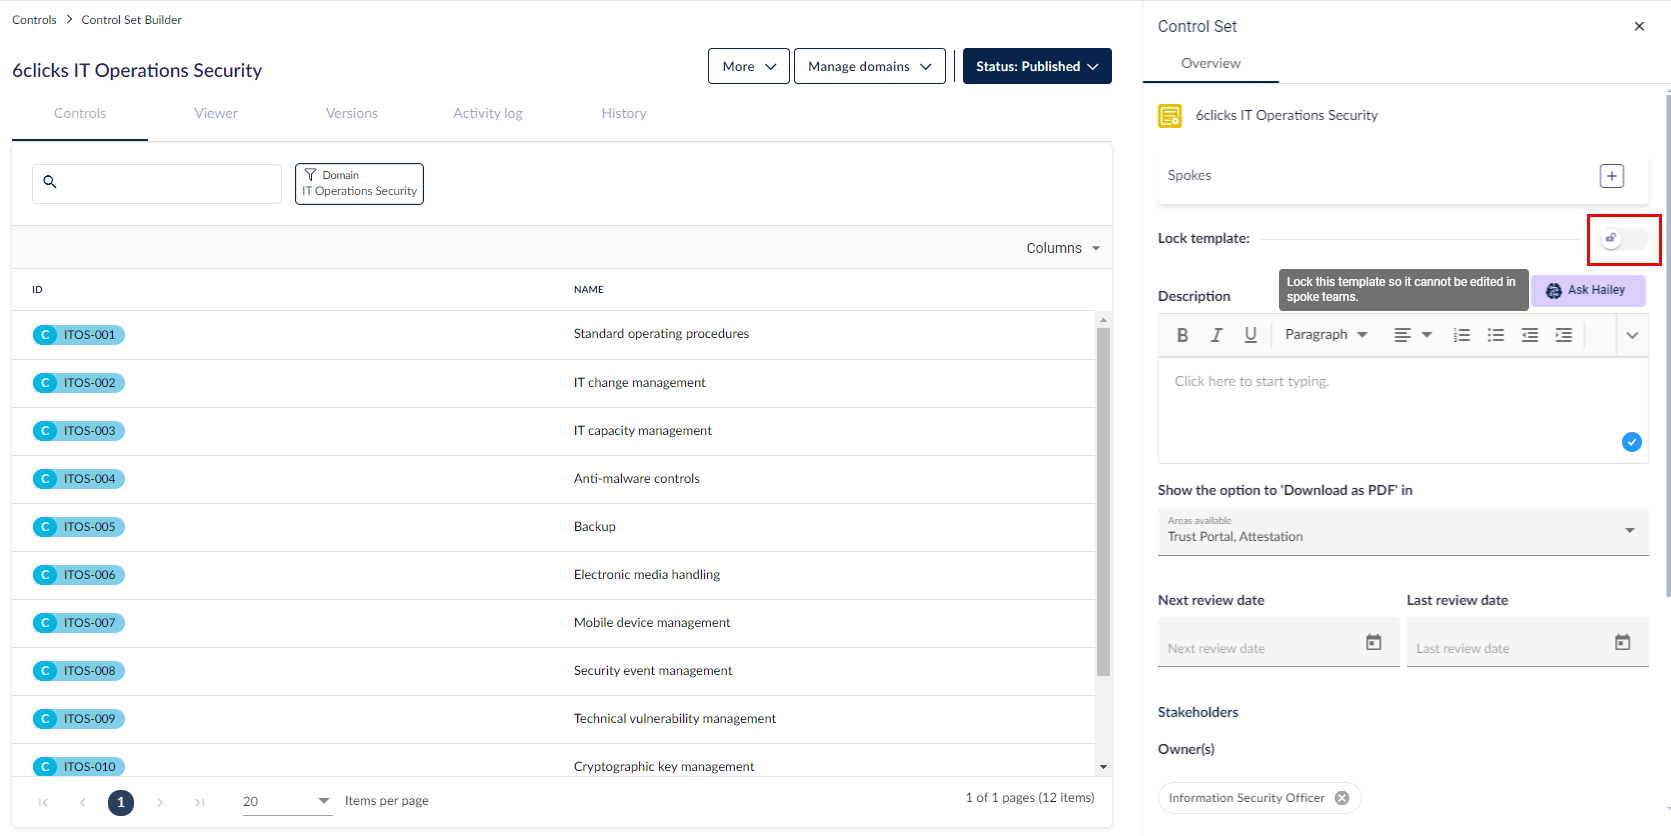
Before pushing a template, you may want to lock it so that your Spokes cannot edit it and can only use it as is. To do so, go into it and toggle on Lock template.
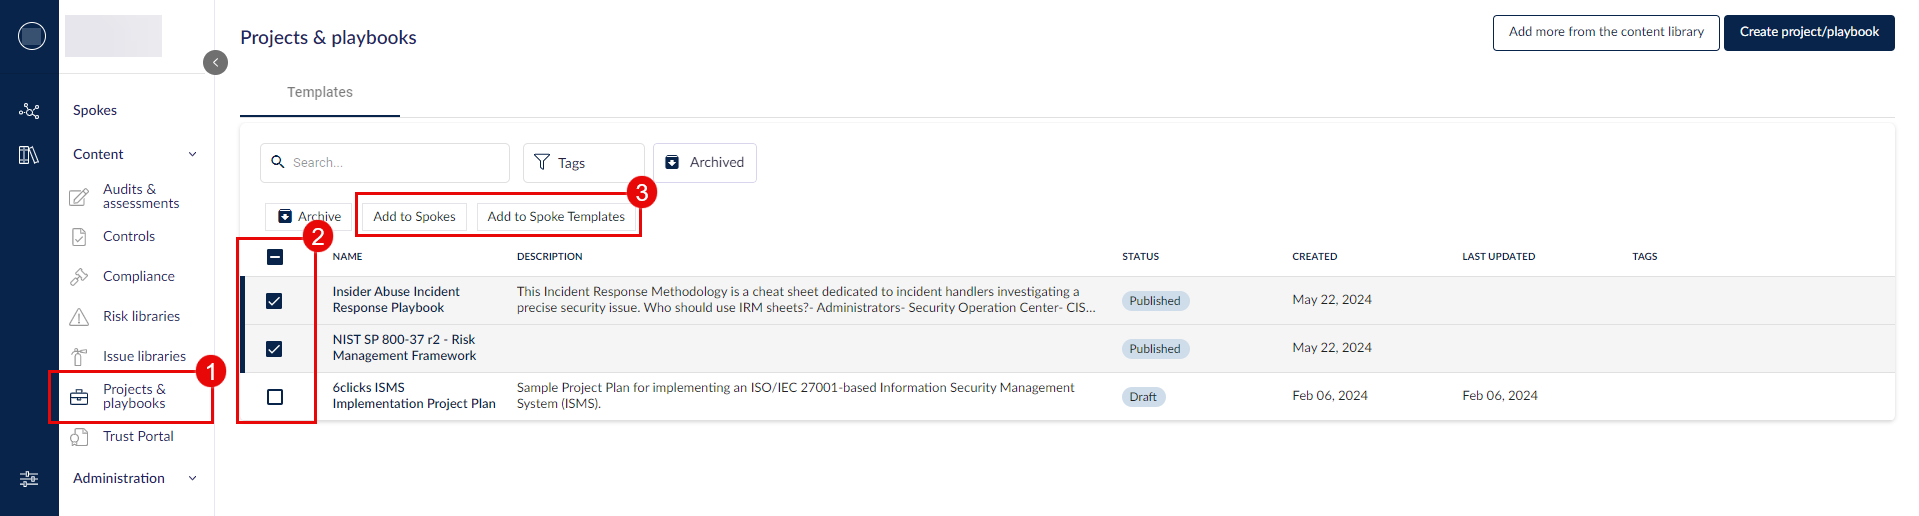
Go to Content > Projects & playbooks (1) and check the template/s that you need to push (2). When you are done, click Add to Spokes or Add to Spoke Templates (3).
Confirm your selection if needed, then check the Spoke/s that you need to push the templates to. You can just Push which means you stay in the Hub, or Login & push which takes you to a spoke to see the template at the Spoke level.
The push action will run in the background, and you are notified when it is complete.
A Hub & Spoke icon will appear next to content that was pushed to Spokes. Hovering over this icon will show more details about the push.
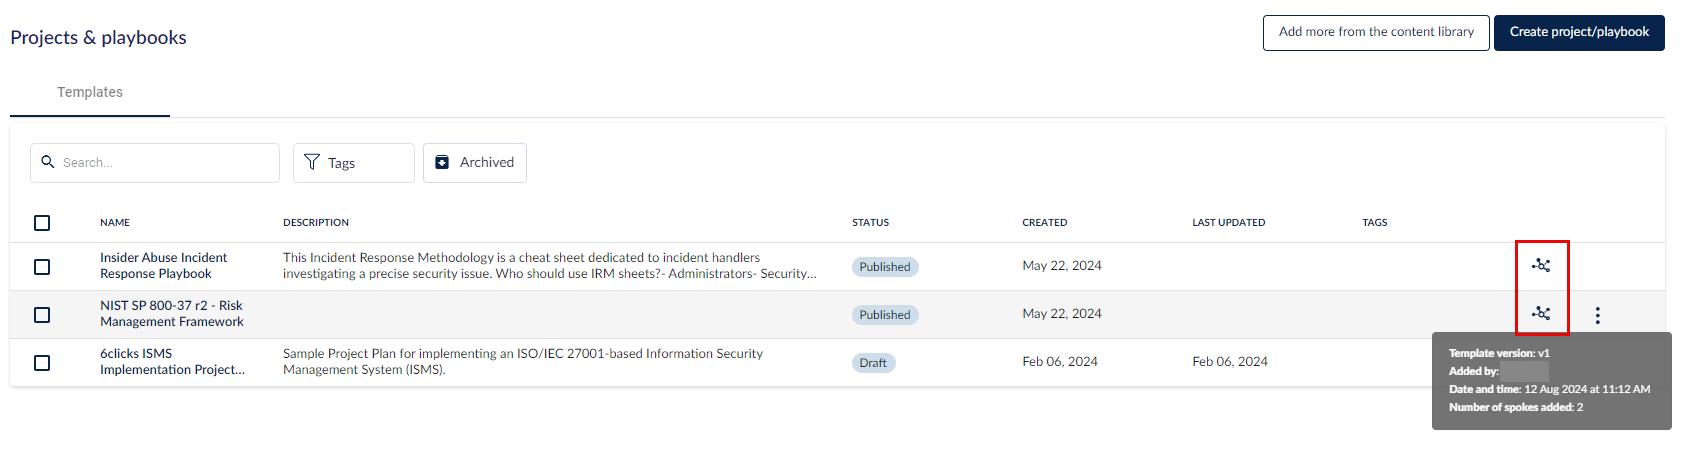
- Template version: the version of the template that was pushed
- Added by: the user who performed the push, according to the Activity log tab
- Date and time: when the push occurred, according to the Activity log tab
- Number of spokes added: the number of Spokes that this template is in, according to the Activity log tab
This piece of content is available for use in the Spoke/s it was added to.
If this content was added to a Spoke template, it will be in Spokes created using the Spoke template.
Pushing control sets
Head here to learn how to add a control set from the 6clicks Content Library, if you don't have any templates yet. Head here to learn more about controls.
Before pushing a template, you may want to lock it so that your Spokes cannot edit it and can only use it as is. To do so, go into it and toggle on Lock template.
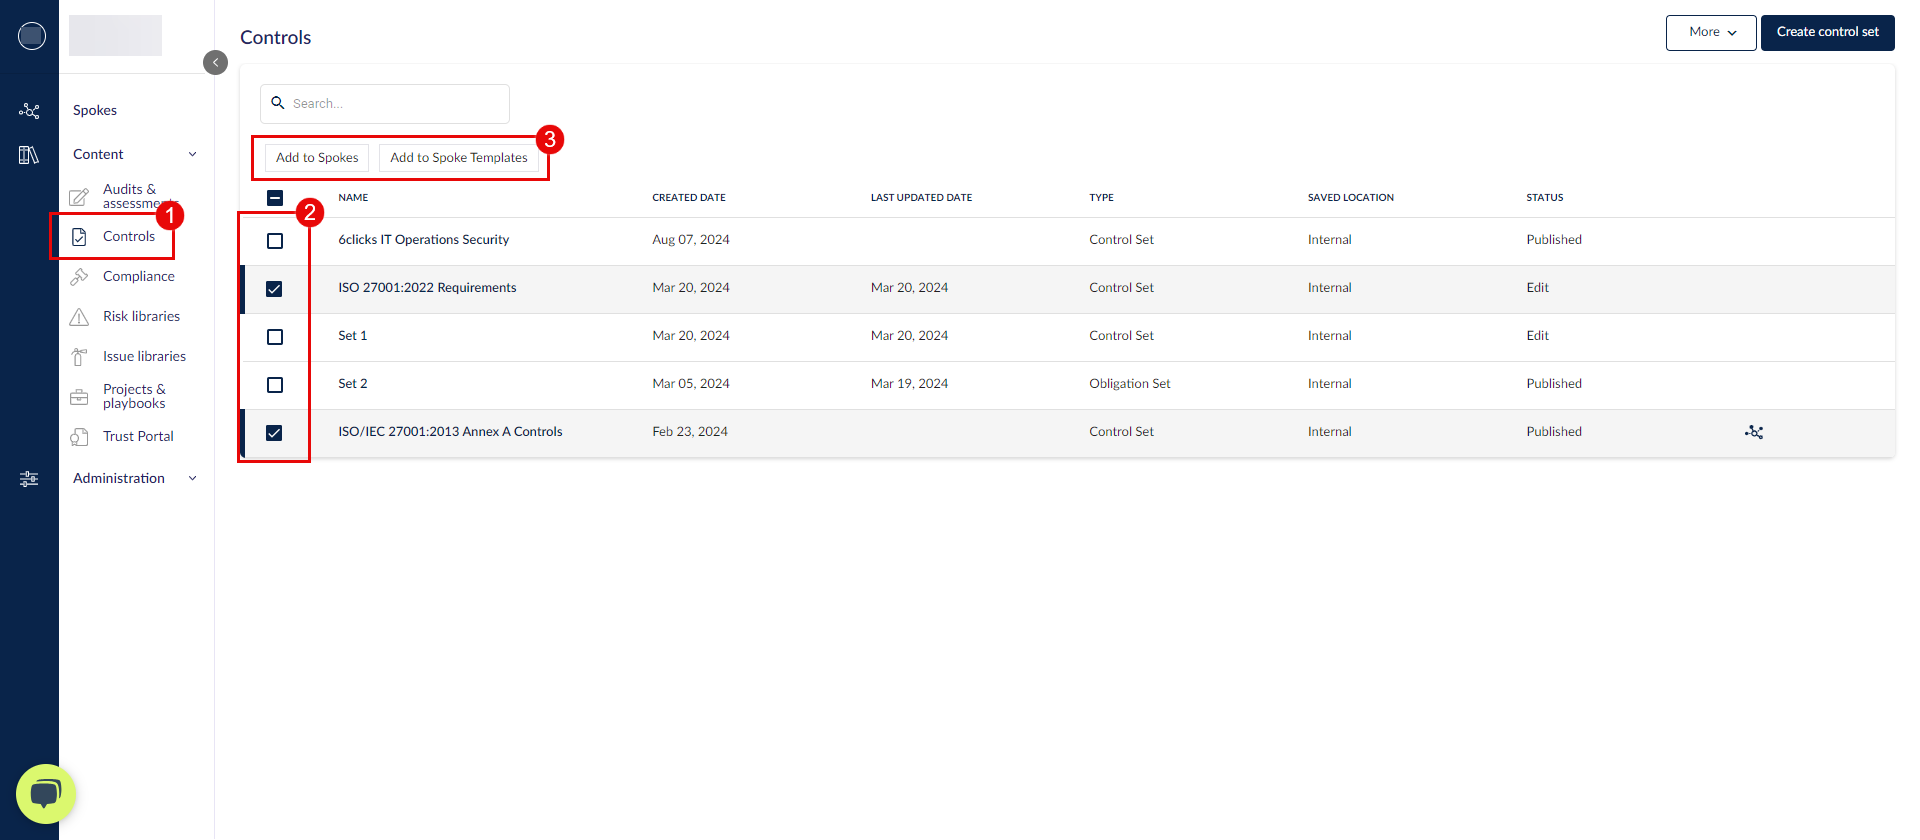
Go to Content > Controls (1) (or what you renamed it to) and check the template/s that you need to push (2). When you are done, click Add to Spokes or Add to Spoke Templates (3).
Confirm your selection if needed, then check the Spoke/s that you need to push the templates to. You can just Push which means you stay in the Hub, or Login & push which takes you to a spoke to see the template at the Spoke level.
The push action will run in the background, and you are notified when it is complete.
A Hub & Spoke icon will appear next to content that was pushed to Spokes. Hovering over this icon will show more details about the push.
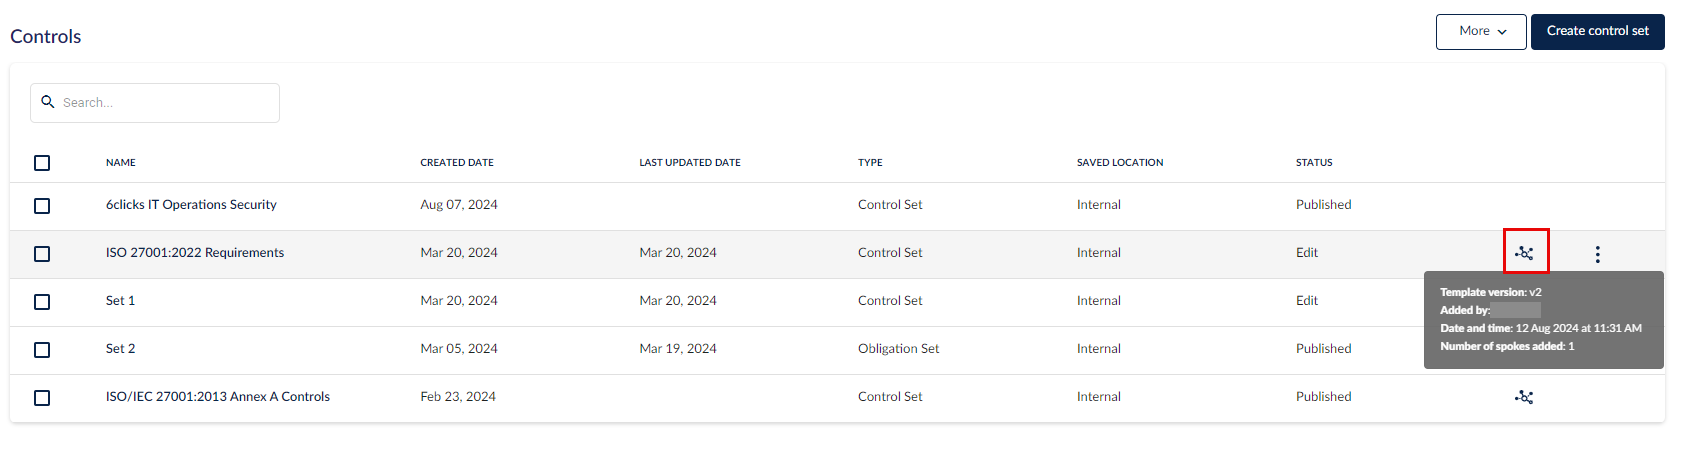
- Template version: the version that was pushed
- Added by: the user who performed the push, according to the Activity log tab
- Date and time: when the push occurred, according to the Activity log tab
- Number of spokes added: the number of Spokes that this control set is in, according to the Activity log tab
This piece of content is available for use in the Spoke/s it was added to.
If this content was added to a Spoke template, it will be in Spokes created using the Spoke template.
If a control set already exists in a Spoke, the below message would appear.

Using bulk selection, if you choose to push the control set down to both Spoke/s in which it already exists, and Spoke/s in which it does not yet exist, it will always be created as a new control set in Spoke/s in which it does not yet exist. It will be created or updated based on your selection in Spoke/s in which it already exists.
The Update existing option follows the below set of logic.
- All data related to a control can be updated, and data linkages e.g. to risks are retained, except in the case of when the control ID is changed.
- If the control ID is changed, this deletes the control with the previous ID at the Spoke level and creates a new control with the new ID at the Spoke level. Previous linkages are not retained.
- All data related to a responsibility can be updated, and data linkages e.g. to previous tasks are retained, except in the case of when the responsibility name is changed.
- If the responsibility name is changed, this deletes the responsibility and all its tasks with the previous name at the Spoke level and creates a new responsibility with the new name at the Spoke level. Previous linkages are not retained.
If the equivalent control set is being edited at the Spoke level when the Hub pushes its new version down, any edits made in the Spoke are discarded.
If the Spoke changes the control set name, the Hub will no longer recognize it and will create a brand new control set with a name that is in line with the latest Hub version.
Control custom fields management at the Hub
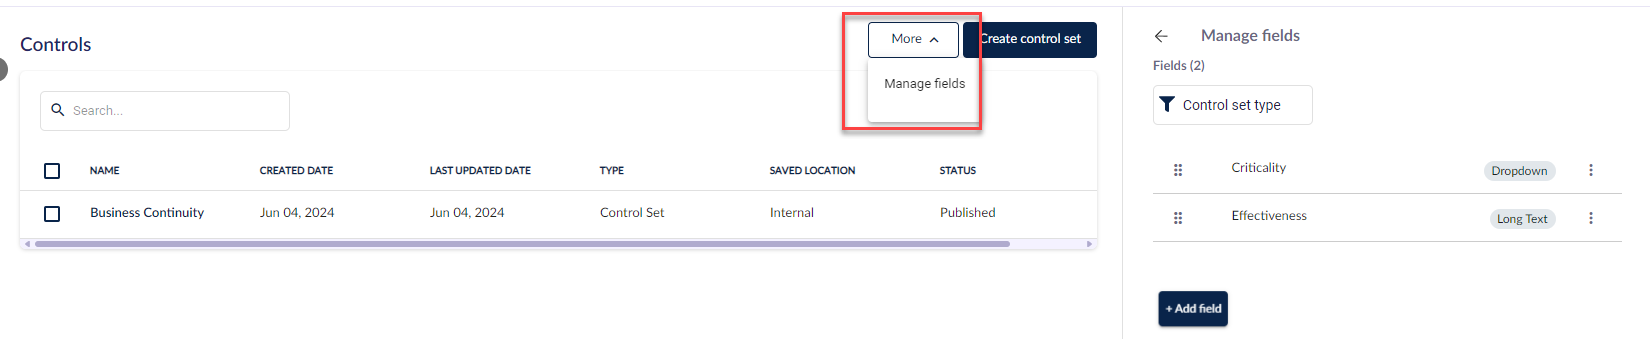
To manage control custom fields centrally at the Hub, head to the Controls module and select More > Manage fields.
Make the necessary changes to your control sets and hit Publish. Then, click on Clients + and select (1) the clients you want to push these changes to, and hit Push → (2).
Pushing authorities
Head here to learn how to add an authority document from the 6clicks Content Library, if you don't have any templates yet. Head here to learn more about authorities.
Go to Content > Compliance (1) and check the authority document/s that you need to push (2). When you are done, click Add to Spokes or Add to Spoke Templates (3).

Confirm your selection if needed, then check the Spoke/s that you need to push the templates to. You can just Push which means you stay in the Hub, or Login & push which takes you to a spoke to see the template at the Spoke level.
The push action will run in the background, and you are notified when it is complete.
A Hub & Spoke icon will appear next to content that was pushed to Spokes. Hovering over this icon will show more details about the push.
- Template version: the version that was pushed
- Added by: the user who performed the push, according to the Activity log tab
- Date and time: when the push occurred, according to the Activity log tab
- Number of spokes added: the number of Spokes that this authority document is in, according to the Activity log tab
This piece of content is available for use in the Spoke/s it was added to.
If this content was added to a Spoke template, it will be in Spokes created using the Spoke template.
Activity log
The activity log shows the following information:
- The user who pushed the content
- The version of the content that was pushed
- The date it was pushed
- The Spokes it was pushed to
To check the activity log of a piece of content, click into the content and go to the Activity log tab.

Click on Show Spokes to check the specific Spokes it was pushed to.