Importing an assessment using a CSV file
Learn how to import a Question-Based Assessment (QBA) by converting a CSV file to a JSON file
This article outlines step-by-step instructions on how to convert an Excel spreadsheet representing a QBA into a usable assessment in 6clicks.
For creating a QBA natively within the platform instead, start here.
Table of contents
- Why should I do this?
- Prerequisites
- Creating a JSON template
- Linking controls/provisions
- Risk status
- Answer types
- Populating the template
- Creating the import file
- Importing the assessment into 6clicks
Why should I do this?
If you have already created a Question-Based Assessment (QBA) in Excel, you may want to import it straight into 6clicks instead of tediously copying and pasting cells.
This method of creating a QBA works best when all the questions have identical answer options.
The more variations there are between the answer options of each question, the more edits you will have to make to the assessment or the final JSON file.
Prerequisites
1: file format
Firstly, ensure that your source file is indeed a CSV file, depending on the compatibility of your CSV-to-JSON tool. If it is a XLSX file, you can save a copy of it as a CSV file.
We will be using a free online tool which accepts XLSX files.
2: JSON editor
Ensure that you can display and edit JSON files. In this article, we will use Visual Studio Code, but you can use something else. There are also free JSON editors available online.
3: mandatory columns
Make sure you include the mandatory columns.
You can title your columns however you like, but the more columns you use, the more difficult it will be to match them between your CSV and JSON files, so it is easier to use consistent phrasing.
The mandatory columns are:
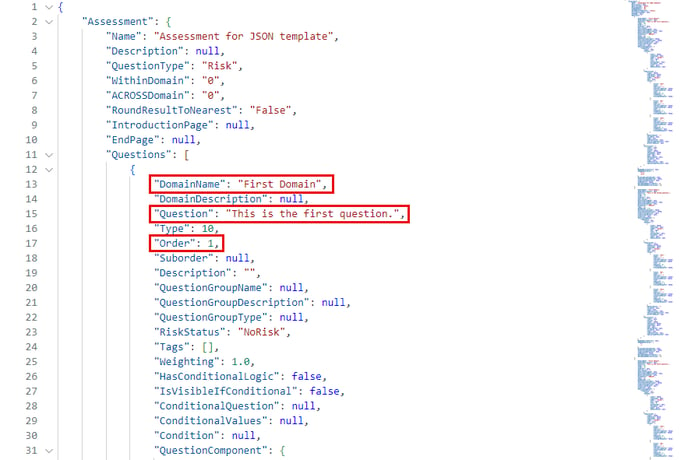
- DomainName (the name of the domain/category/section which contains questions),
- Question, and
- Order (the order of the question within its domain, e.g. the first question has the order 1, and the second question has the order 2, etc).
To add other columns, you can export a dummy assessment as a JSON file and open it in your preferred editor to check their titles.
We will also have to do this when creating our JSON template.
Your additional column headings will depend on your question formats e.g. type, linked provisions/controls, risk status, etc.
At this stage, your CSV columns should look similar to this.
Creating a JSON template
Next, we would need to create a JSON template.
Create a QBA from scratch & link an authority or control set if needed. Fill out information on this screen as closely as you can to how you want the assessment in your CSV file to become.
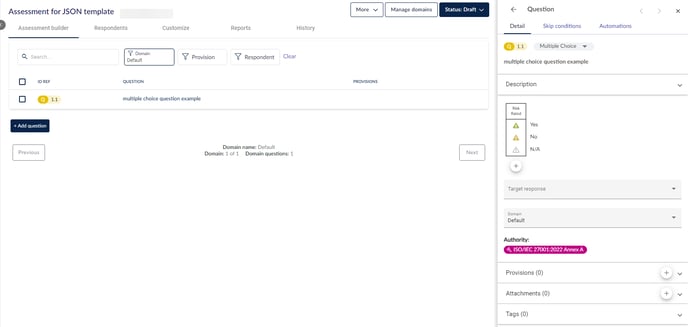
After creating this QBA which will be used as a template, add a question and answer options in the format that you want your assessment in the CSV file to follow.
Learn more about adding questions and question types.

In this example, we are using the same multiple choice answer options (Yes, No, & N/A) for every question in our CSV file, so we create a singular multiple choice question.
The more variations there are between the answer options of each question, the more edits you will have to make to the assessment or the final JSON file.
Link a provision to the question if you want provisions linked to the questions in your CSV file.
It doesn't matter which provision/s you link to the question in the template, as this will just be a placeholder for the information in our CSV file.
Export this assessment as a JSON file by clicking on More > Export (JSON).
Open the JSON file in your preferred editor, and you should see all the column headings and structure as applicable to your assessment.
In Visual Studio Code, right click anywhere and select 'Format Document'/press Shift+Alt+F to display the information properly. In Visual Studio Code, a JSON file can be previewed on the side. We can see that (1) is the actual assessment and (2) is the linked control set/authority, if applicable.
This means that if you import this assessment into a different Hub or Spoke, it will come with existing linked controls/provisions, and you will be able to find the full control set/authority in their corresponding module (Controls/Compliance).
Linking controls/provisions
If you are not linking controls/provisions to questions, you can ignore this section.
To link a control or provision to a question in your CSV file, add a column with a column titled EITHER MappedPolicyControl for controls, OR MappedReferences for authority provisions. Like any other QBA, only either controls or provisions can be linked, not both.
To link multiple controls or multiple provisions to a question, add multiple columns and give them different names to differentiate between them; if you are linking many controls/provisions, you should involve increasing numbers as we need to count columns later.
Add the ID of the applicable control/provision to the corresponding cell, beginning with the first column (if using multiple columns).
You can find all the controls/provisions and their IDs below the actual assessment questions, or navigate to the corresponding module in 6clicks (Controls/Compliance) to view them.
Risk status
If you are using the same answer options for the whole assessment, you can ignore this section and just select the corresponding risk status for answer options while creating your template using the dummy assessment.
Risk status is only used if the QBA is using the risk rated assessment style, and has multiple choice/dropdown menu/checkboxes answer types. To learn more, head here.
The field riskStatus for a value (answer option) as part of a multiple choice, dropdown or checkbox set of answer options indicates the level of risk that this answer poses.


Very low (blue): 6
Low (green): 1
Medium (yellow): 3
High (orange): 4
Very high (red): 5
Empty: leave the field blank (null)
Answer types
If you are using the same answer type for the whole assessment, you can ignore this section and just select the answer type you need while creating your template using the dummy assessment.
The field Type for a Question indicates the type of answer you are expecting.
To learn more about each answer type, head here.
Multiple choice: 10
Checkboxes: 3
Dropdown menu: 2
Short text response: 9
Long text response: 4
Populating the template
Copy or cut everything for your singular question in the JSON file. This should include the first curly bracket under Questions, the corresponding closing curly bracket, and everything in between.
Paste this into a new JSON file. You don't have to, but it is easier to separate this part out as we need it later.
Open your CSV file and match each column to the corresponding JSON fields by putting "{f(column number)}" in each of the fields.
The mandatory field Order does not have quotation marks because it is a number field and not a text field, so it would just be {f(column number)}.
In our example CSV file, the domain names are in the first column, so in the JSON file, DomainName should say "{f1}".
Do the same for any other non-mandatory fields that are in your CSV file. In our example, we have some linked authority provisions, so we will also include them in the corresponding fields.
Everything that we do not alter will populate as is for every question.
Creating the import file
The next step is to use a tool to fill in the template using the CSV file. In this example, we will use this free online tool, but you can use any other similar program.
Import your CSV file for Step 1. Copy and paste everything from our altered JSON file (just the question) into Step 4. Delete any existing text for the top and bottom sections.
Click Convert CSV To JSON via Template or the respective button to generate the output in Step 5. The output should include every question you have in the CSV file using the format from our JSON file. If you have many questions, this may take a while.
Copy everything from Step 5 and put it back into the first JSON file (the one that has the assessment overview details, linked authority, etc) where it was taken from.
In this example, we kept our column headings in the CSV file so that we can make sure everything is matching up exactly, which means we generated a dummy question with information from the heading. We can either delete it at this step or before importing the CSV file to the tool. (Alternatively, delete the row from the CSV file and re-import it into the tool and generate again.) To delete the non-question from the populated JSON file, selecting everything inclusive of the curly brackets for the first question and delete it.
This assessment should now be ready for import into 6clicks, but we can check the first question to be sure.

These fields correspond with our CSV question.
In our example file, we also included linked provisions, so we should check those as well near the bottom of the question.
Importing the assessment into 6clicks
Save your finished import file and head to Audits & assessments in 6clicks. Create a new assessment or use your dummy assessment by clicking on More > Import, after which you can delete the default domain to get rid of your singular question.
You will see a yellow pop-up text box in the bottom left corner when the action is queued. Once the action is queued, you can work on a different module or close 6clicks and come back later.
When the action is completed, you should have a notification for it.
This assessment is now just like any other assessment in draft status.
You can edit it further or publish it.


