To create a new 6Clicks application (type: SPA OpenID Connect) in Ping Identity (PingID), you will need administrative permissions in both environments.
1. Retrieve 6clicks SSO settings and the roles to be used for Ping SSO
Sign in to 6clicks with a user account that has permission to administer Single Sign-On and Roles.
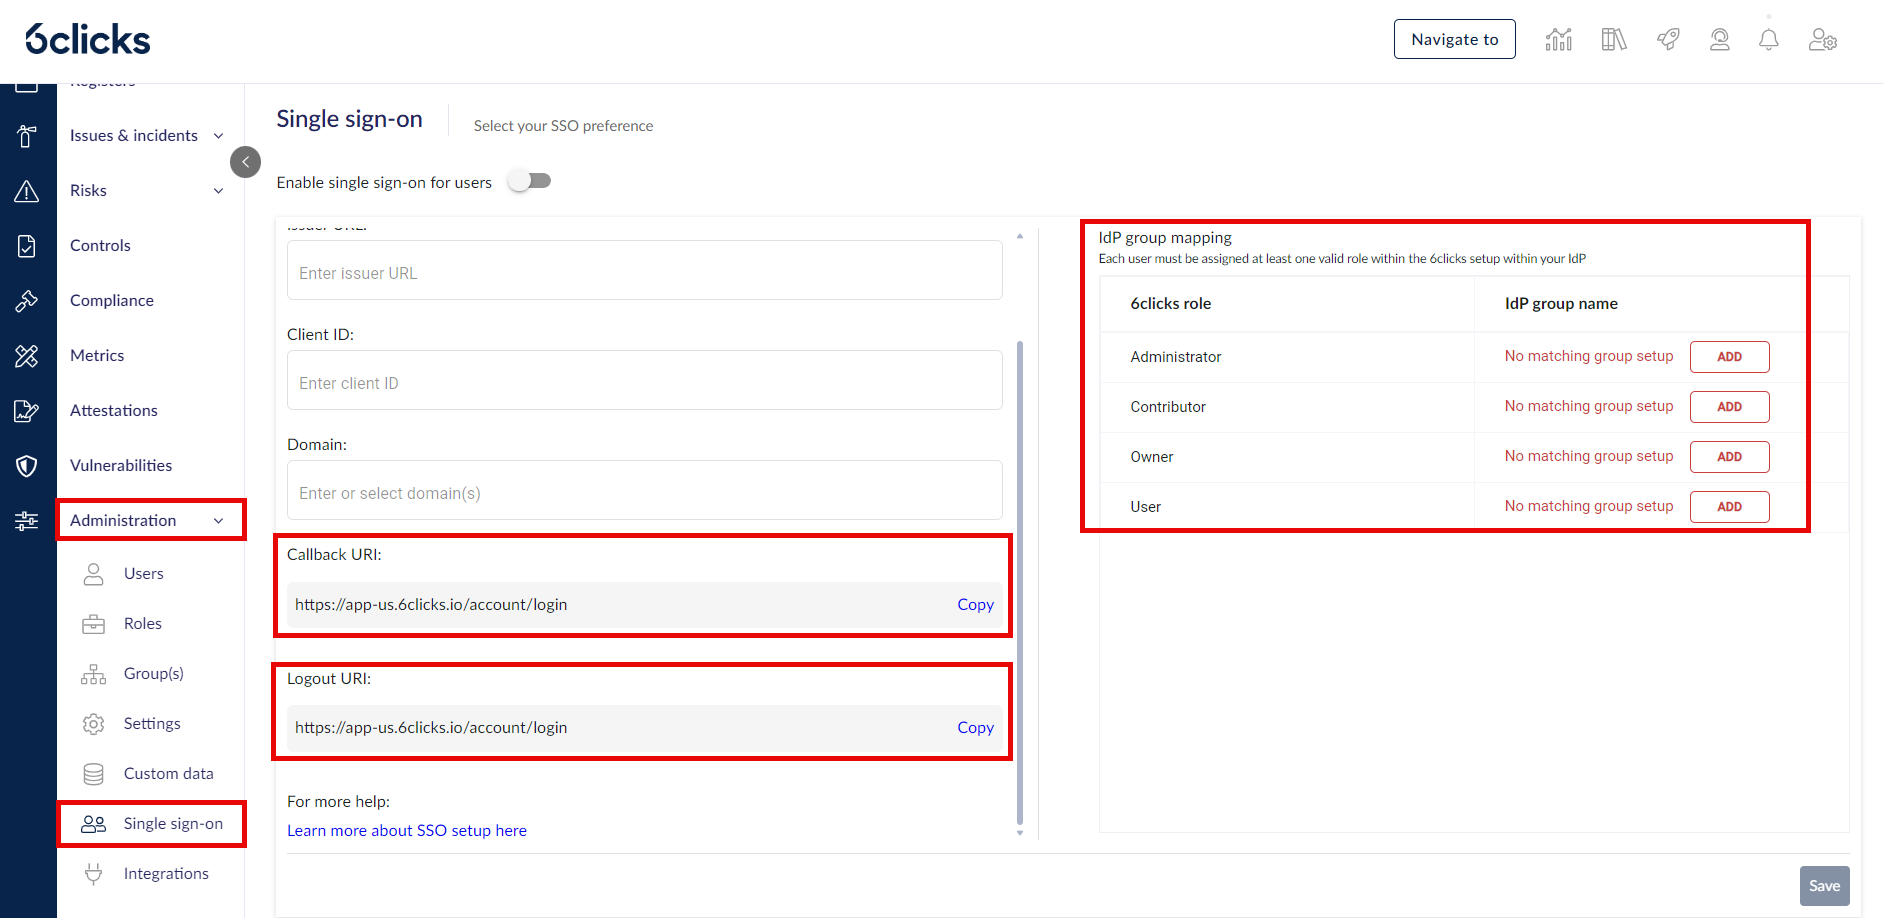
Navigate to Administration → Single Sign-On. Note the Information within the Callback URIs, Logout URI, and Roles fields for use when configurating the Ping application.
Create or take note of the 6clicks roles you will be using in your single sign-on environment. You will create corresponding groups in Ping to map to these roles. You can learn more about user roles and permissions here.
2. Ping: Create Groups matched to 6clicks roles
Login to your Ping Identity Admin Console and choose your environment.
From the menu, choose Identities → Groups and click '+' to add a new group.
 The SSO process is used to allocate 6clicks roles to each user. This requires each user to be in a group that matches at least one valid 6clicks role, displayed in the 6clicks SSO dashboard (and in Administration/Roles).

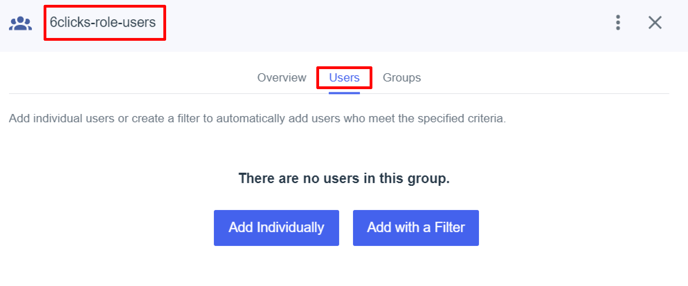
Each 6clicks role needs to be added to a group you create in Ping with the prefix ‘6clicks-role-', for example:
-
6clicks-role-Administrator
-
6clicks-role-Users
-
6clicks-role-CustomRole1

After you choose ‘Save’, the option to add users and groups to this new group will appear. You will need to add users to each group based on your particular requirements.
3. Ping: Create the Application
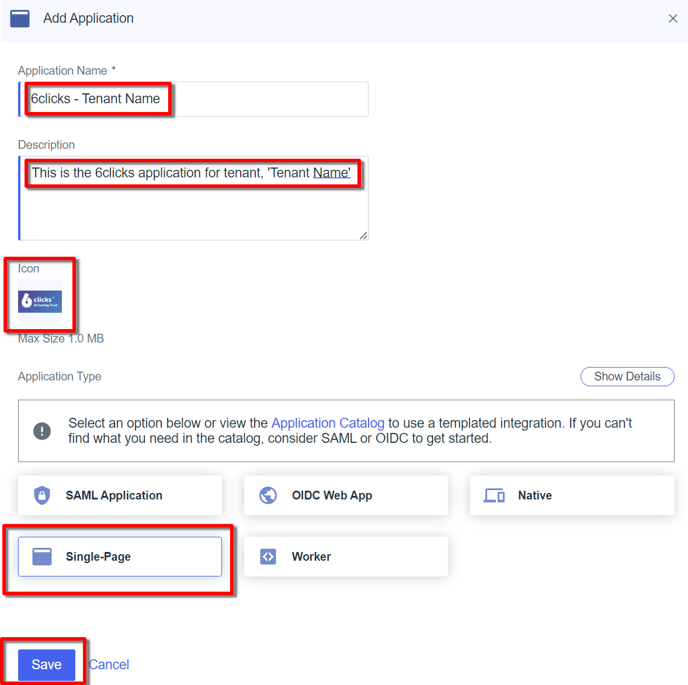
From Connections → Applications → click '+' to add an application. Add the following settings and then click Save:
-
Application Name: free format but we recommend ‘6clicks - Tenant Name’ to be descriptive
-
Description: optional
-
Icon: You can download the 6clicks logo from our Media Kit
-
Application type: Single page
4. Ping: Configure the application
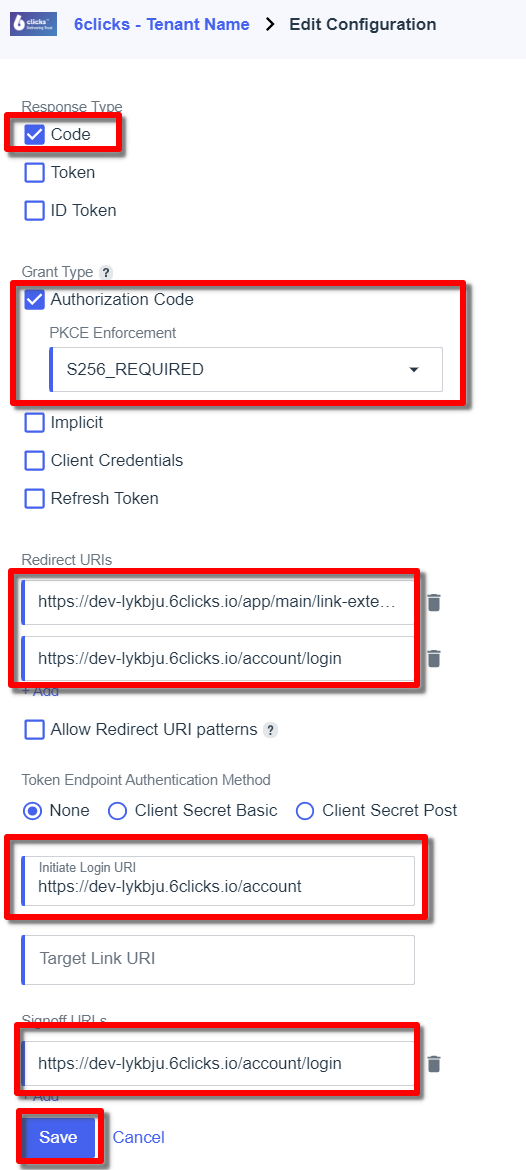
Application Protocol Setup
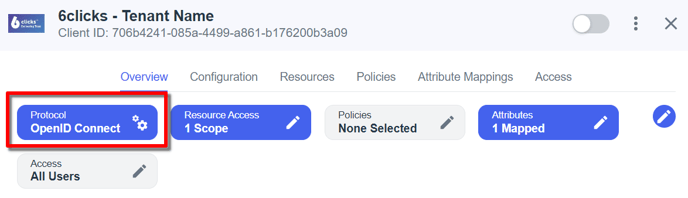
Once you have created and saved the application, you will see a screen with all the application settings. Choose Protocol.
Update the settings (see example below):
-
Response type: Code
-
Authorization Code (checked) with PCKE Enforcement: S256_REQUIRED
-
Redirect URIs: <retrieved from 6clicks SSO dashboard>
-
Initiate Login URIs: <retrieved from 6clicks SSO dashboard>
-
Signoff URIs: <retrieved from 6clicks SSO dashboard>
Click Save
Issuer URI
As soon as you hit save in the protocol setup, Ping displays the configuration tab, which has the Issuer URI. You will need the issuer URI to complete the SSO setup in 6clicks, so please note it for future reference.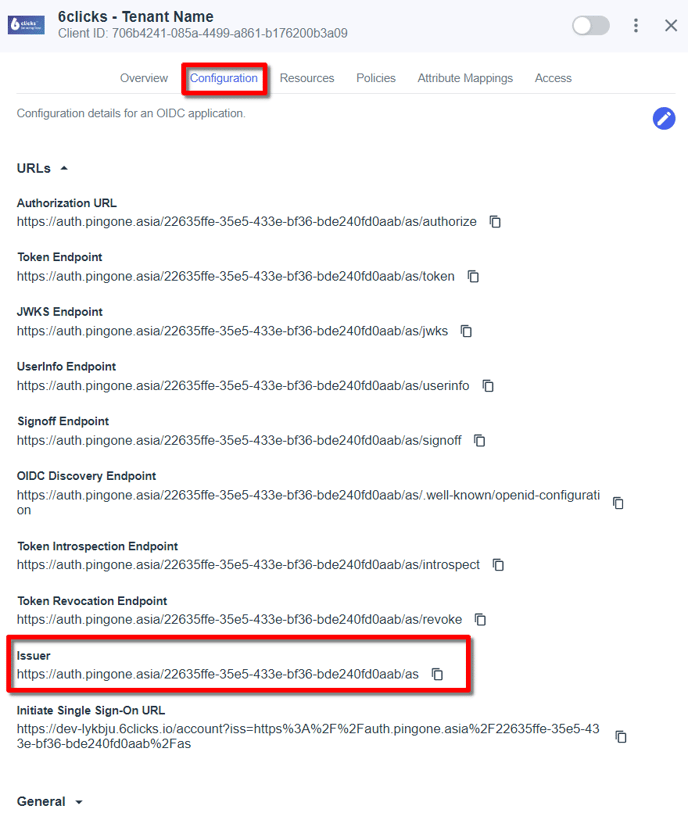
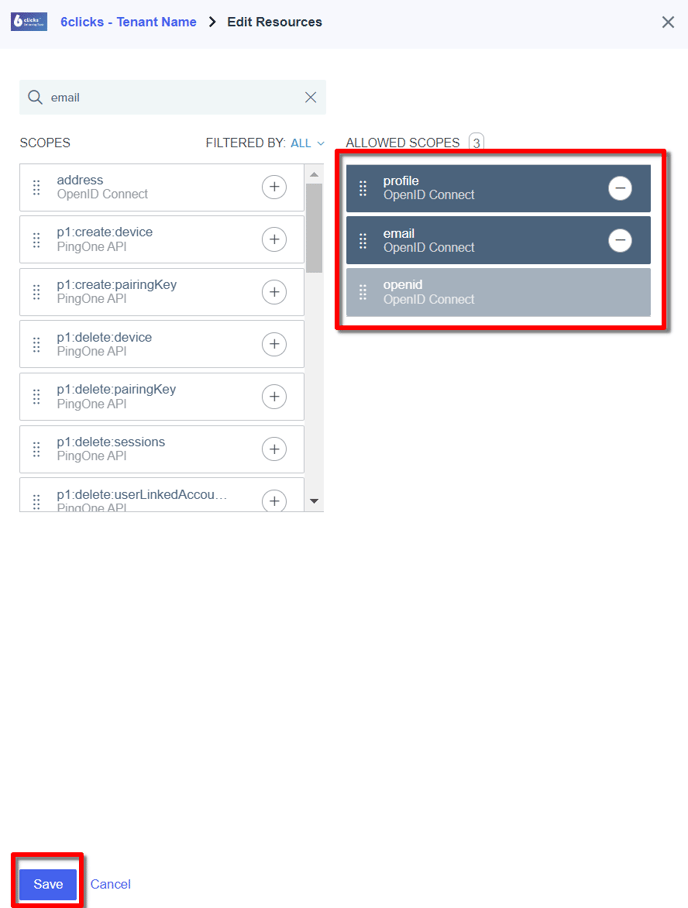
Resources Setup
Select the Resources tab, click the ‘pencil’ icon to edit and add the Profile and Email scopes. Click Save

Policies
The Policies tab is where you setup policies such as MFA authentication. We highly recommend you setup policies and that align with your business requirements.
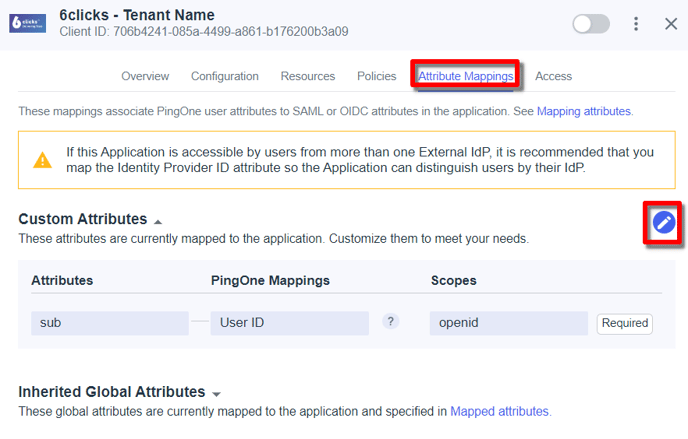
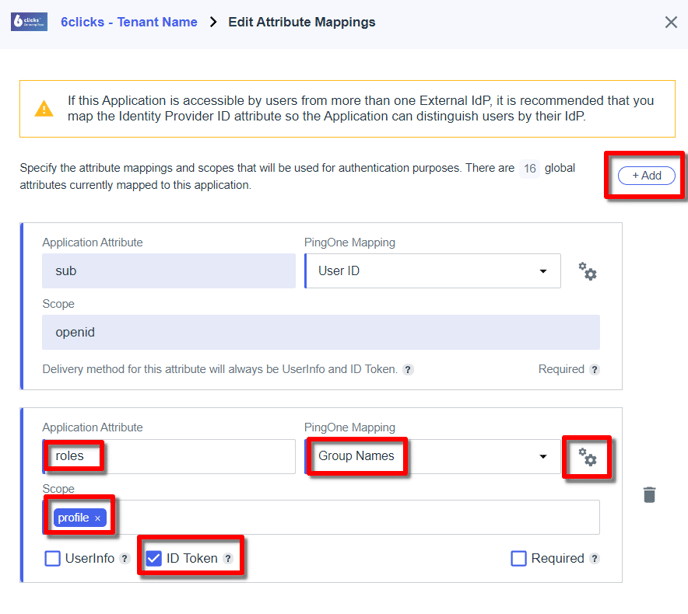
Attribute Mappings
Next, we need to map the groups to an attribute so that they will appear in the ID token. From the Attributes tab, click the ‘pencil’ icon to edit.
Click the + Add and also Advanced configuration button (not shown in screenshots).
-
Application Attribute: roles (must be called ‘roles’)
-
PingOne Mapping: Group Names (see below for the gears icon settings for the group name)
-
Scope: profile
-
ID Token: <checked>
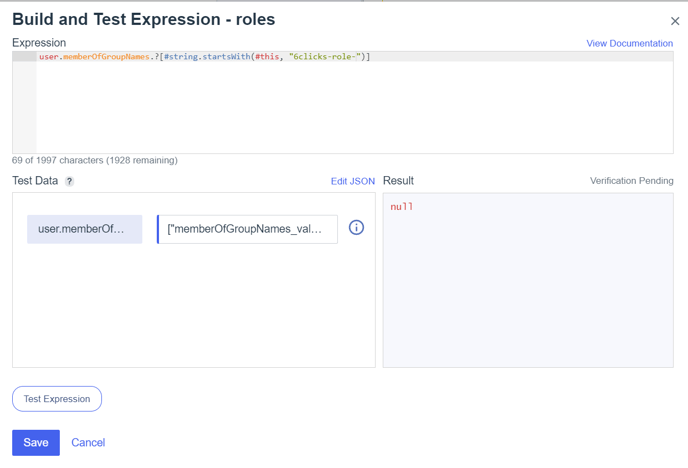
Group Name Expression
Click the ‘gears’ icon next to the PingOne Mapping to open the Ping Expression language builder. Add the following to filter for our group names.
-
Expression: user.memberOfGroupNames.?[#string.startsWith(#this, "6clicks-role-")]
Click Save
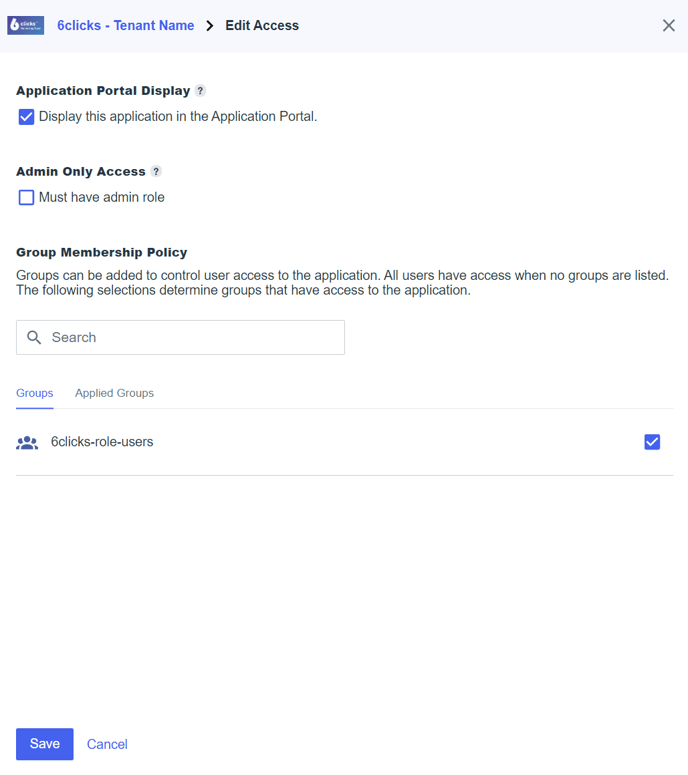
Access
Select the Access tab and click the ‘pencil’ icon to edit.
-
Application Portal Display: <checked>
-
User is a member of any applied group: <checked>
-
Groups: add in all of your 6clicks groups.
Click Save
4. Activate The Application & Note the Client ID

Finish 6clicks Setup
You should now have an Ping Client (application) ID and an Issuer URI. Armed with this information head back to 6clicks to finish the 6clicks SSO setup.