Table of contents:
Overview of notifications
6clicks includes both in-app and email notifications out of the box.
Email notifications will be sent to the email account linked to the user and include a short summary, alongside a link back into the relevant record in 6clicks.

Note: To ensure consistent email delivery of 6clicks application notifications, we recommend whitelisting the domain *.6clicks.io This will automatically cover all associated subdomains we may use, ensuring that all email notifications are successfully delivered to the recipients and are not automatically unsubscribed should the sending domain change.
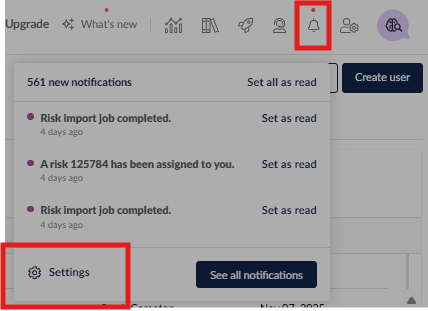
In-app notifications appear under the Bell icon in the top right of the 6clicks app. A red dot will appear above this icon when there are unread notifications. Click on the Bell icon to view a popup showing the latest notifications.

Click See all notifications to be directed to the in-app notification page. This shows a summary of all notifications sent to the user.

From here, users can be linked to the relevant records and notifications can be set as read or deleted as needed.
Managing notifications
Notifications are managed on a user-by-user basis, meaning that an individual user has the ability to determine which notifications they do or do not want to receive.
To change the notifications that are being received, click the notification Bell icon at the top of the page, click Settings, then Notification Settings.
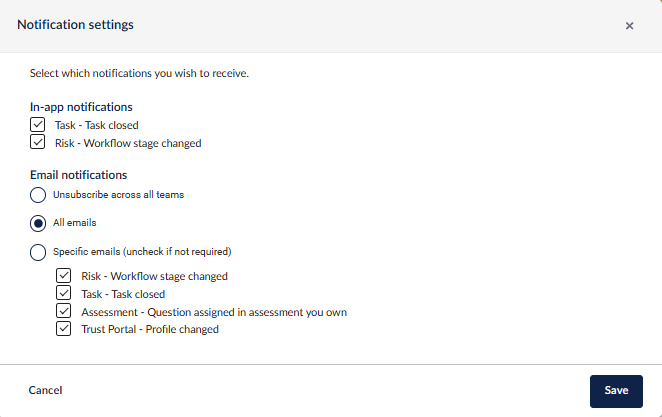
From here, you can:
- Enable/disable all notifications
- Enable/disable specific notifications
Ticking a notification enables it.
In the above example, all notifications are enabled.
Click Save at the bottom right of this page to save all changes to notifications.
For more information on how to customize notifications, please refer to the article Custom Notifications.
6clicks-Managed Unsubscribe Feature
The 6clicks-Managed Unsubscribe feature enhances how email unsubscribe requests are handled within the platform.
This feature ensures unsubscribe actions are intentional and prevents automatic unsubscribes triggered by external security settings or email scanning tools.
How It Works
-
When a user clicks the “If you'd like to unsubscribe and stop receiving emails, click here” link in an email notification:
-
A new browser window opens.
-
The user is prompted to provide a reason for unsubscribing.
-
The user must submit their request to confirm.
-
-
Once submitted:
-
Email notifications are disabled for that user.
-
This process prevents automatic unsubscribes caused by security systems or email link scanners.
-
Managing Email Subscription Status (Admin View)
Administrators can view and manage email notification status directly within the platform.
Users Overview
-
Navigate to the Users Overview window.
-
Email notification status (enabled/disabled) can be viewed for each user.
User Profile Settings
Within an individual user profile:
-
A new setting is available:
-
“Subscribe to emails (across all teams)”
-
-
This setting can be configured on a per-user basis.
-
Enables centralized control of a user’s email subscription status.
Managing Notification Preferences (User View)
Users can manage their own notification preferences at any time.
Accessing Notification Settings
-
Click the Notification Bell icon in the top-right corner of the platform.
-
Select Settings.
-
Review all available notification options.
-
Select or deselect notifications as required.
Re-activating Email Notifications
-
Users who have previously unsubscribed can re-enable email notifications from the same Notification Settings menu.