Custom Notifications
Discover how to personalize your notifications to receive customized updates for different modules in 6clicks.
Table of contents:
- Configure Custom Notifications
- Permissions
- Configuring Notifications
- In-app Notifications
- Conditions
- Hub and Spoke support
Log in to your 6clicks environment and go to Administration > Notifications.
If you do not see Notifications in your environment please contact the 6clicks support.
Permissions
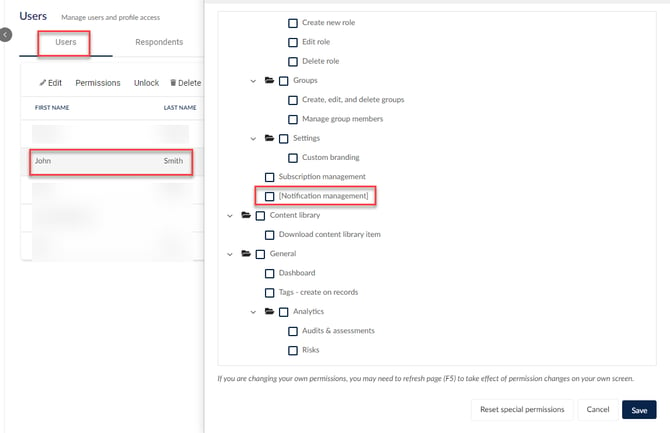
The Notification feature is automatically enabled by default for all Administrator users and can also be assigned to individual users as needed in the Permissions tab. Go to Administration>Users and click on the user you wish to assign this permission to. Make sure the Notification management option is ticked and click Save.
Configuring notifications
The platform provides a variety of configurable notifications that allow you to keep users informed about relevant activities and assignments.
To begin, navigate to Administration > Notifications. This opens the Notification Management window, which displays all areas of the platform where notifications can be generated.
From this window, you can review existing notifications and customize them to meet your organization’s needs.
The example below demonstrates the available customization options for a Responsibility Due Date Reminder, showing how notifications can be tailored to include specific, relevant information for the notified user based on their assignment or activity.
1. To customize notifications, start by clicking on the pencil icon.
2. On the right side, you can make any changes necessary. Enable Email notifications by moving the toggle to the right.
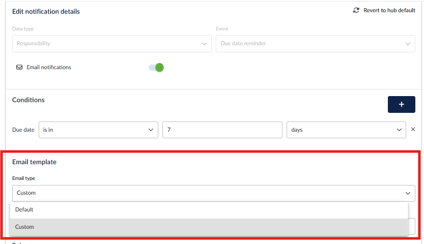
3. Select the Conditions you want to apply, then choose whether to use the default email template or create a custom one. In this example, a Custom template has been selected.
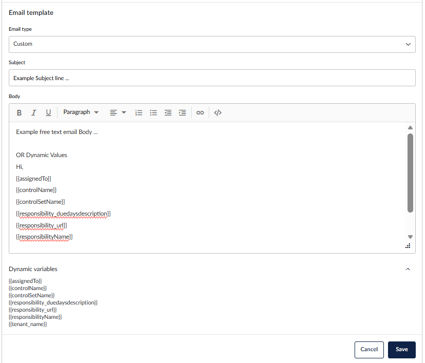
4. Enter the Subject of your custom email.
5. Enter a general email in the body. Note that a header with either the 6clicks logo or your orgnaization's custom-branded logo, as well as a footer with an unsubscribe link, will be added to the email.
6. You may optionally use dynamic variables in both the email subject and body. Click Dynamic Variables to view the list of available variables. To the right of each variable, you are given the option to copy it to clipboard, allowing you to easily paste the variable into the email subject or body. Be sure to include the "handlebars" {{ }} around the variable name, and enter the variable exactly as shown to ensure it functions correctly.
7. For finer control, click on Source Code in the top right of the editor and you can edit the raw HTML code
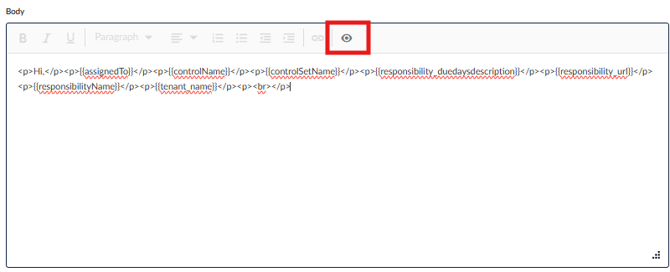
8. Once you have finished customizing the notification, click Save to apply your changes.
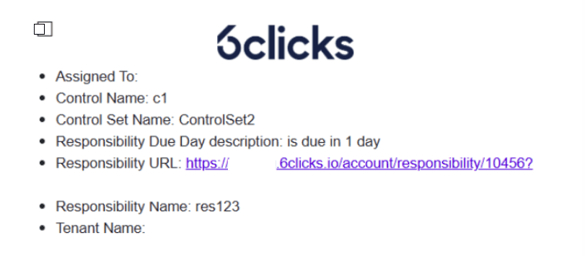
In this example, once the specified conditions are met, a notification email is sent to the user. In some cases, there may be multiple assignees; each assignee will receive an email notification. However, the notification will display only the name of the assignee who receives it. An example notification is shown below.
In-app Notifications
When available, some events offer the option to enable or disable in-app notifications, as well as emails.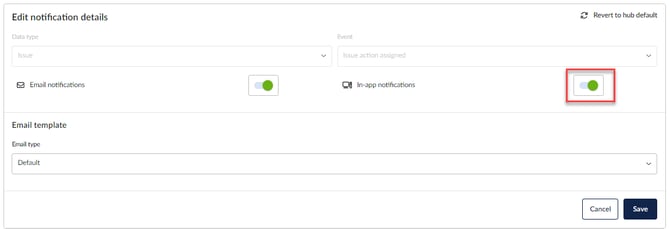
Conditions
Some event types allow for conditional logic to be specified. In particular, this can be used to specify reminder cadences. Here we will use Issue - Action due date reminder as an example.
First, edit the Issue - Action due date reminder event.
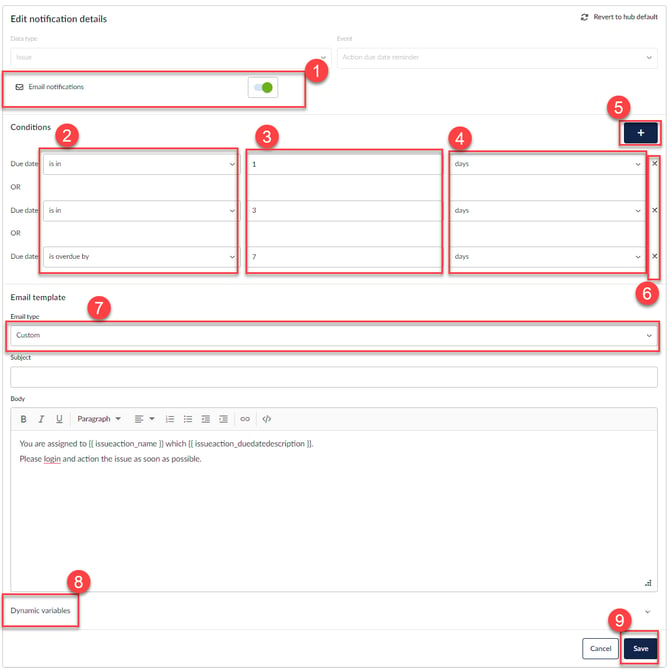
The image below shows the steps for configuring when the issue action reminder should be sent.
(1) - Enable Email notifications by moving the toggle to the right.
(2) - You can change between either an upcoming due date or a past due date, by selecting either is in or is overdue by.
(3) and (4) - Select the number of days, weeks or months.
(5) - To add more conditions to your issue actions, click the plus sign.
(6) - To remove any fields, click the X.
(7) - In the Email Template section, select Custom under Email Type and enter your desired email subject and email body.
(8) - You can choose dynamic data from the list of Dynamic variables. For example, enter You have one issue action due from {{tenant_name}} .
(9) - Once you’re happy with your changes, click Save .
The email will be sent when any of the specified conditions are met. For example, in the image above, the email will be sent 3 days prior to the due date, 1 day prior, and 7 day after.
If you need to send different notifications depending on the conditions (such as sending different email content before and after the due date has passed), you can create additional notifications configurations for the same event by clicking Create notification.
Notifications for task status updates are sent to owners or applicable users.
Hub and Spoke support
By default, the notifications settings established in the hub account will also apply to all spokes. If desired, these settings can then be overridden by the Spoke account.
To override Hub defaults for a certain spoke, log in to the spoke account as an advisor or administrator, go to Administration>Notifications, and make changes as required.
In the image below, a badge (1) indicates that the notification settings are inherited from the hub. When no badge is shown (2), the notification settings are configured by the spoke. You can delete the spoke settings and revert to the Hub settings by clicking the trash can icon.To ensure consistent email delivery of 6clicks application notifications, we recommend whitelisting the domain *.6clicks.io This will automatically cover all associated subdomains we may use, ensuring that all email notifications are successfully delivered to the recipients and are not automatically unsubscribed should the sending domain change.

