Table of contents:
- Installing the Power BI Desktop application
- Adding the 6clicks custom connector
- Connecting to your 6clicks instance
- Automatic refresh of 6clicks data in Power BI
Installing the Power BI Desktop application
- The Power BI Desktop application is available from the Microsoft Store.
Adding the 6clicks custom connector
- Log into 6clicks as an Administrator and navigate to the Administration > Integrations > Power BI section and click Connect.
- Download the custom connector (or "PQX file").
- Copy the PQX file into the correct subfolder under your "Documents" folder. Note: If this is a new install of Power BI you may need to create the folder structure first:
- For standard Windows installations it will be under the Users\{username}\Documents\Microsoft Power BI Desktop\Custom Connectors folder on your device.
- For OneDrive users it will be under OneDrive\{username}\Documents\Microsoft Power BI Desktop\Custom Connectors.
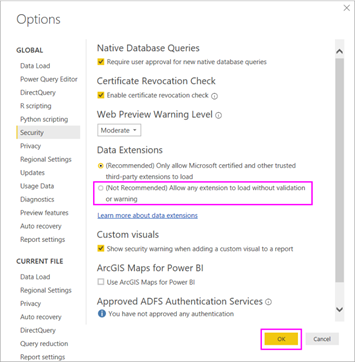
- Next, open Power BI Desktop and select File > Options and Settings > Options > Security.
- Under Data Extensions, select (Not Recommended) Allow any extension to load without validation or warning.

- Under Authentication Browser, ensure Use my default web browser is selected.

- Click OK and then restart your computer (recommended).

Connecting to your 6clicks instance
- Once the PQX file is in the Custom Connectors folder, the connector will be available in Power BI. To connect, click Get Data from the top ribbon toolbar in Power BI and select More...
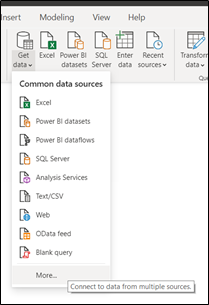
- The Get Data dialog will appear. Select Other and scroll down to find the 6clicks connector, then click Connect.

- You will then see a pop-up with a preview of the 6clicks data available. Select Transform Data.

- You will likely receive a credential error initially, to authenticate you will need to follow the sign-in process by selecting Sign in as a different user.

- This will take you to your browser to either sign in with your 6clicks account, or use the existing 6clicks session if 6clicks is already open. Close the browser when complete.
- Return to Power BI and press Connect.
- You will now have your 6clicks data connected with Power BI and ready to explore.


Automatic refresh of 6clicks data in Power BI
If you would like the 6clicks data available via Power BI to automatically refresh, head here to learn how to set this up through Microsoft's On-Premise Data Gateway.
If your organization uses the 6clicks Hub & Spoke architecture, connecting to Power BI at the hub level enables you to see data for all spokes, and you can filter the data for each spoke. Connecting to Power BI at the spoke level enables you to see data for that spoke only.